Showing posts with label hand sewing. Show all posts

Stockholm Sewing Festival

This weekend my aunt, my mom and I visited the Stockholm Sewing Festival at Stockholm International Fairs. I love the Sewing Festival! It's the largest Swedish fair for sewing, quilting, knitting, embroidery and a host of other, fabric related crafts. Always really inspirational to visit.

It's been a couple of years since I last went, and to be honest I think that's a good thing - a lot of the sellers return every year so you start to recognize things from previous years. But after waiting a couple of years I found lots of new inspiration!

One of the biggest thrills for me this year was visiting an entire stall devoted to English paper piecing - I rarely see a lot of EPP in Sweden but apparently it's on the rise! If you're in Sweden and feel like buying some EPP supplies without splurging on overseas shipping, have a look at QuiltPassion! I couldn't resist buying some hand quilting thread, it will come in very handy once I start sewing my hexie quilt together. I also got some clamshell templates - not sure what they will become yet, but I'm thinking maybe a pillow using some of the Liberty fabric I got in London?

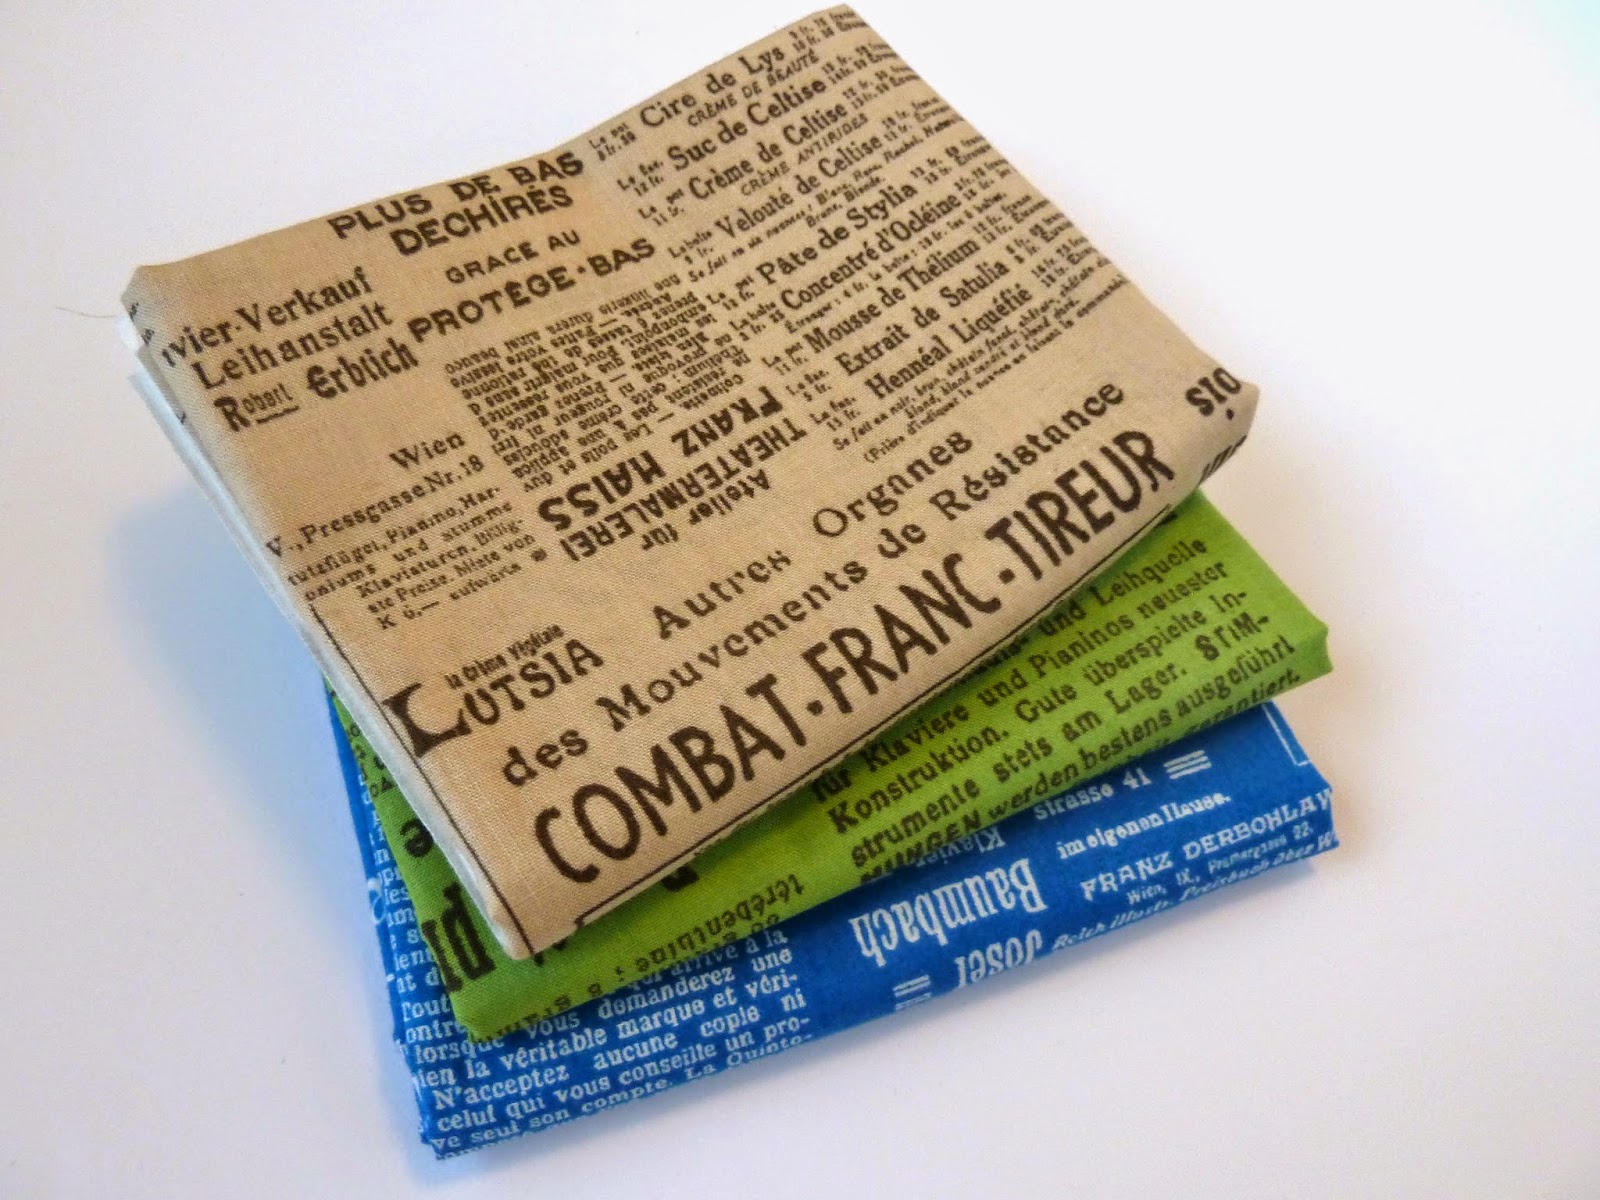
 Of course I had to get some fabric, too, but I tried to resist impulse buying. The yellow, orange and red in the photo above is going straight into a project, so I figure it almost doesn't count... Oh well. I did manage NOT to buy this amazing wool embroidery kit from Swedish embroidery artist 
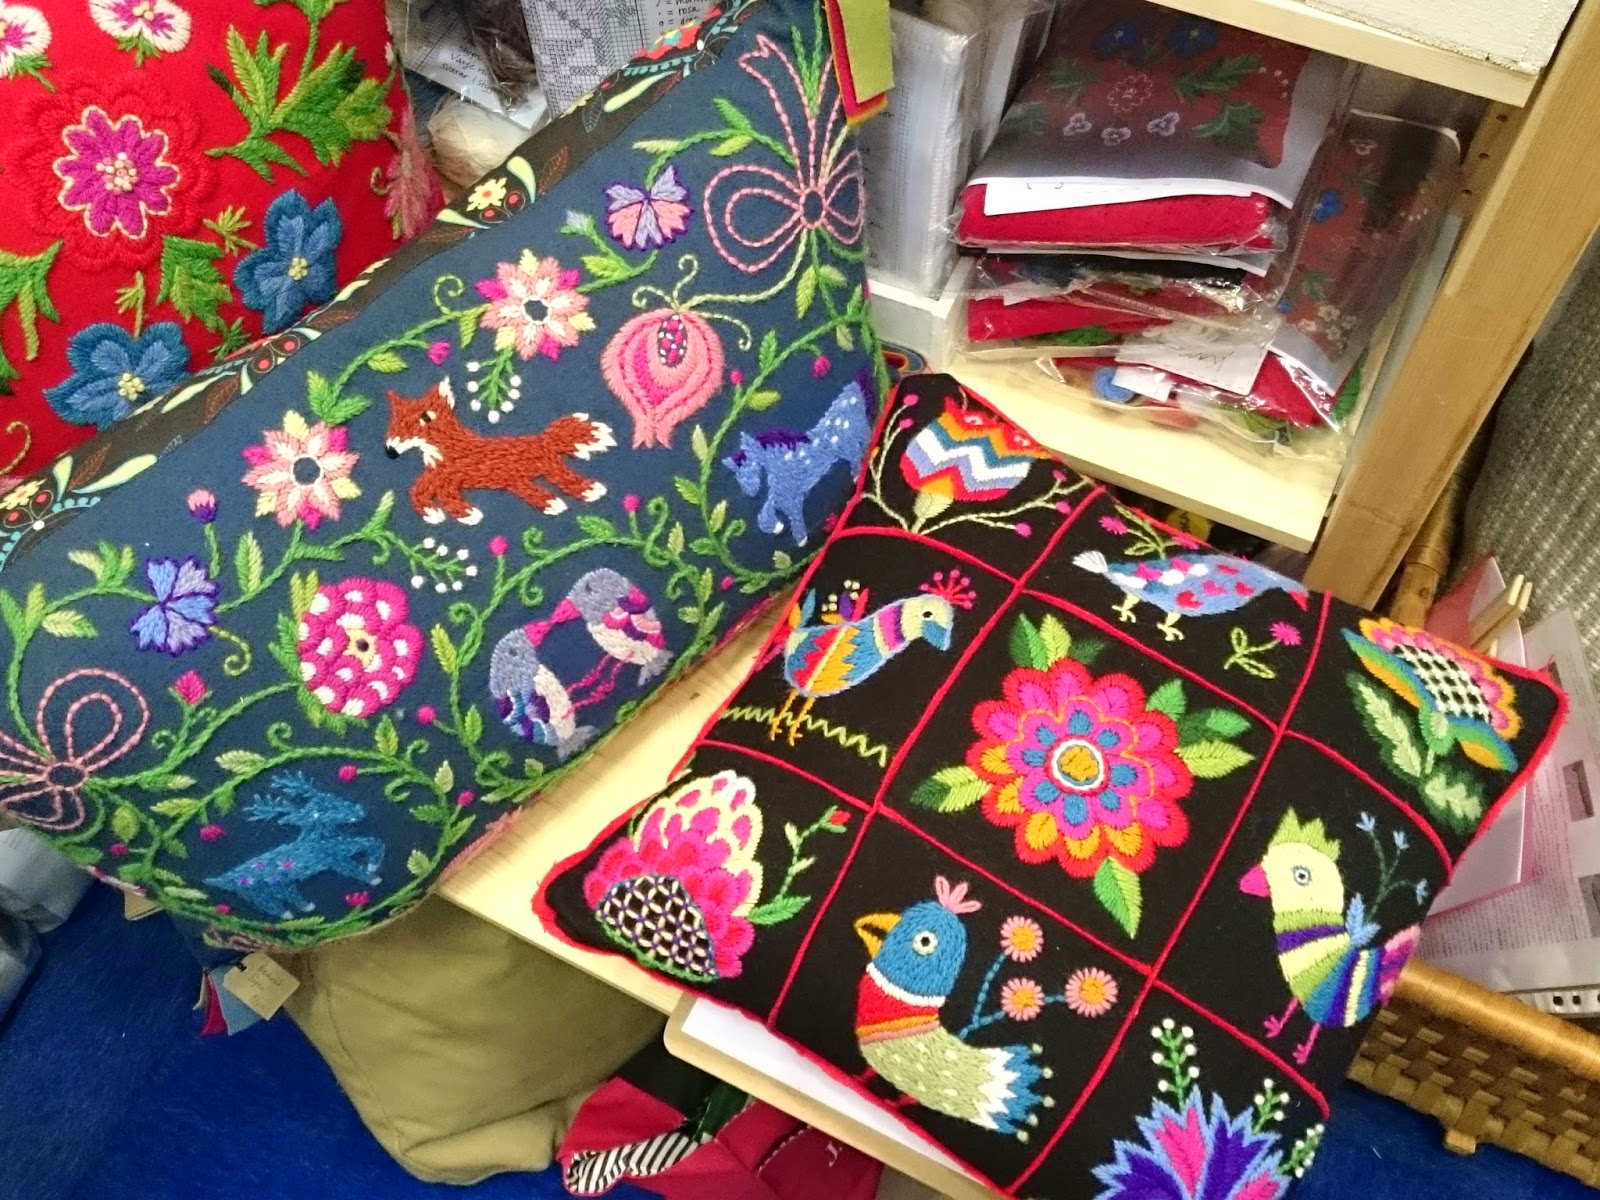
Karin Holmberg. I love the look of wool embroidery and I would really like to give it a go, but I just don't think I'm ready to take on a huge project like this. I'm hoping to take a class on wool embroidery someday, there's so much to learn!


I spent a lot of time ooh:ing and aah:ing over all the traditional swedish wool embroidery at the fair though. All those vibrant colors - yum!


In other news, I have had my hands full with starting a new job, mom visiting and Keith contracting a really nasty virus which completely knocked him out - meaning our Valentine's Day was spent on the couch watching TV. I did get him some flowers and chocolate though, so not a total loss! I hope to get back to blogging regularly soon, I just need to find a way to organize myself and get settled with the new job. Hope you all have a great week!

Another alphabet quilt update

I apologize for sort of dropping of the map this past week! I just started a new job (I'll be working at my favorite NGO, Amnesty International! Yay!) so my mind has been on things other than crafting this week. But I did want to show you what's on my living room floor at this moment:

Progress! That's all the background pieces for my hexagon alphabet quilt, cut out and prepped. Finally! I was getting so sick of cutting and gluing a thousand shades of white and off-white...

I laid all my pieces out in order to get a feel for what the background will look like when it's all sewn together, and to check that I had a balance of solids and patterned pieces that I was happy with. I'm hoping to keep the background interesting, without detracting focus from the letters themselves. Do you think I've found a decent balance between the two?

I will be taking a bit of a break from this quilt for the coming month, as I have another patchwork project (do you remember the secret project I mentioned a while ago?) that is demanding my attention. But my hexie quilt is never far from my thoughts! I'm really excited about how it's looking so far - I'm hoping I will still be this excited about it once it's completed. I can't wait to begin stitching it together!

Colorful candy patchwork

Look at all that fabric, pre-washed, ironed and all folded up. Yum! It took a while, but I finally managed to iron all that fabric I washed last week. Now it's ready to be used in a colorful patchwork project that I have in the works.The project itself will have to remain secret for the time being since it's going to become a gift - I can't believe that gift giving season is around the corner already! But I couldn't help sharing a quick snapshot. These cheerful patchwork blocks remind me of pick-n-mix candy. Yum indeed!


Hexies, hexies on my mind

It's been over two months since my last hexagon quilt post! To hold myself accountable (and make sure the hexies won't languish indefinitely in my cupboards in favor of some instant-gratification-type project) I thought I would post periodic updates - so here's what's going on in hexie land (a.k.a my living room floor - the only surface in our apartment that is big enough to lay all these out) these days!


I have made a total of 405 hexies so far - that translates to about 2/3 of what I need for the backgound and about 40% of the total hexies needed for the entire quilt. Slow but steady progress! I'm still focusing on getting the background hexies done first. The other day,  decided to lay out the first three lines of letters, just to get an idea of what the background will look like and what the ratio of white to patterned hexies should be. I want the background to be interesting, but it can't be TOO interesting or I risk taking the focus away from the letters. This is what it looks like so far:


And yes, I am fully aware that in these pictures the alphabet actually says A, B, C, D, E, K, L, M, N, F, G, H, I J. But don't worry, the final quilt won't! :-) As I was laying out the hexies on the floor I realized too late that I had gotten the lines mixed up, but since the point  of the exercise was mostly to determine the ratio of white to patterned pieces I didn't bother rearranging them.

Even though cutting out hexies is quite meditative, I have to admit that cutting hundreds of off-wite solids isn't that exciting. Can't wait to start on the actual letters. And now I really need to decide on colors for the letters - I have been thinking about this for months and I still can't decide! Oh well, I still have over 200 background pieces left to make before I REALLY have to make the decision...

That's my progress so far! If you feel like making your own hexagon quilt, check out this post.

Dresden plate potholder

Time for more hand sewing! Keith and I have been listening to this awesome audio book (in Swedish) for several weeks now. We love listening to audio books together - it's much easier to concentrate on the story (and not get caught up in the dishes, dinner or whatever you're doing while you're listening) when you have someone right there with you to discuss it with. We have taken to listening in our combined office/craft room, that way he can work on projects at the desk and I can sit at my sewing table. It's been great. The only problem is that it's hard to go to bed when we get caught up in a particularly interesting chapter! I started this hand sewing project last week to have something to do while we were listening, and it only took two (rather long) evenings to complete.

This potholder/trivet is completely hand sewn, made using my new favorite technique English paper piecing and a perfectly sized Dresden template (which Keith created for me using some computer program or other - don't even ask), and the layers of Insul-Bright and Warm&White batting are held together with some simple hand quilting. I really need to work on my hand quilting skills, as you can probably tell!

I do think I did well on matching the fabrics for this one though. The "hipster kitty" fabric in the center is a really neat Spoonflower fabric by independent designer Andrea Lauren. Although it seems that this particular print has been discontinued since I bought my swatch, I can really recommend a look through her huge library of spoonflower designs.

I really like the text fabric as well, so much so that I bought it in three different colorways. I can see myself using it a lot in future. In fact, I'm already planning on using the blue one for an upcoming project - but more on the later. Have a great week!

Planning a pattern: my hexagon alphabet quilt

I promised earlier that I would share a tutorial for planning a hexagon alphabet quilt, so here goes! Keep in mind that I’m by no means a professional quilter, I’m just sharing my own process hoping it might be useful for someone.

I love the look of hexagon quilts and I had been thinking for a while about starting my own. Once I started thinking about this and looking around for inspiration, I found several beautiful quilts using letters as part of the design, including these quilts by artist Joanna Rose from a 2011 folk art quilt show, and this 2012 quilt from a blog called The Inklingo Sampler. I knew I wanted to make something similar, but figuring out how was a bit of a challenge. I had never planned an EPP quilt before, but here's the rundown on what I did (apologies if it's a bit wordy): 

I printed off some hexagon graph paper and started to mark out a pattern. Working with hexagons rather than squares was a bit challenging at first, especially spacing and fitting hexagon designs onto a square quilt. But once you have the graph paper it's totally doable! Of course you can make all sorts of designs, not just letters. Google and Pinterest are great sources of inspiration here. Just print some graph paper and start brainstorming – the possibilities are endless! 

With the finished design marked out on my graph paper, I ended up with a rectangle that was 37 hexagons long by 27 hexagons wide. The next step was to decide on a size for the individual hexagons. I wanted a lap sized quilt, but figuring out what size hexies I would need to reach that end result was tricky!  In the end I decided to use hexies that are slightly larger than 1 inch (2,86 cm to be exact) on each side, which given my pattern will make a quilt that is roughly 53 x 63 inches (134 x 160 cm) when completed. You can choose any size hexie for this project, but keep in mind that hexagons are not square (duh) so calculating the size of the finished quilt is a little finicky. If you have a very specific end measurement in mind, break out your calculator! 


So you have your your pattern completed – next you need your templates! If you’ve chosen a common hexagon size like 1” or 2”, you can buy ready-made templates at your local quilting shop or online. But if you’re like me and you ended up with an oddly specific number, this is a great site that lets you input the size of your hexagon and makes a PDF graph paper based on hexies that exact size. Perfect! The I just printed the templates onto a sturdy cardstock and cut the templates out using scissors. 

Keep in mind that a lap quilt using 1 inch hexies can mean around 1000 individual hexagons (my quilt uses 978 hexies), so if you want to prep all your pieces before you start sewing them together you will need A LOT of paper templates. I started a sort of printing-and-cutting assembly line in my living room and made about half of the templates in one go, but of course if you start to assemble and sew your hexies right away that will free up some templates to use several times over. Whichever way works for you!

That’s it, you’re ready to start your own hexagon quilt! Now, I haven’t made a tutorial for the actual EPP piecing and sewing because there are so many of those already floating around the internet – if you are new to English Paper Piecing, these are a couple of good examples:

I hope you found this tutorial useful! I will continue to post my progress on my own hexagon quilt as I go along. If you decide to make one, I would love to see! Just drop a note in the comments.

Edited to add: This blog post originally had an image of the diagram I'm using for my own alphabet quilt, but I have removed it as Tilde of the Inklingo sampler felt that it was too close to her Inklingo quilt design. Naturally I don't want to offend anyone so I took the diagrams down - my apologies to anyone who came here looking for them. But again, a quick Google image search should give you lots of inspiration for planning your own alphabet or any other design. Best of luck!

Hexagon alphabet quilt: My new project

One of the biggest projects I’ve taken on so far this year is starting a hexagon alphabet quilt – hand sewn from nearly a thousand individual hexies! For now I wanted to share some progress pics and tips, but I am working on a how-to for next week, so stay tuned!


I’ll be making the entire quilt top by hand in traditional English Paper Piecing – that means a LOT of hand sewing! I’m fully expecting to spend several years working on this project, and to me that’s part of the charm of EPP – that it’s not meant for fast-results, spur-of-the-moment type projects. To me, hand sewing is a way to slow down in a fast-paced world. It’s really quite meditative, prepping and sewing all those tiny pieces of fabric.So far, I'm working on a bunch of neutrals for the background color.


I did make one concession in the name of modernity, however: I invested in a Sewline Glue Pen. It’s such a life saver, allowing me to prep my paper pieces so much faster than normal and leaving all that hand sewing for when it really matters – joining the pieces. I’m sure that some quilters cringe at the thought of gluing on fabric, but I have tested the method on several smaller projects and found that most of the glue stays on the paper piece rather than on the fabric itself. And it’s water soluble, so whatever small residue is still on the fabric disappears when you wash the finished quilt. If you’re curious, this is an excellent YouTube video describing the process in detail.


Great, isn’t it? I’ve prepped about half of my hexagons so far, and it has been a breeze – the perfect craft for an evening in front of the TV! I’m looking forward to showing you the progress as I go along – I can’t wait to start sewing the pieces together!

Two busy weeks

I haven't been a very good blogger this past month! There has been a lot going on, so here's a short update of what I've been up to:

- I've been working, job hunting, and trying to sort out our budget for the coming months... Boring but necessary! I know I'm not the only one worrying about money these days, what with the awful financial situation... I do hope you all haven't been to badly affected!

- I've finished up some swaps at Craftster, and received some great items. Check out this cute notebook holder I received in the Small De-stash Swap!


I love the little felt owl, and since I am obsessed with "to do"-lists, I know it will be useful! Trying to use up some of the felt in my own stash, I made a needle book for my partner in another swap.


It's got 4 pages and a small pocket on the inside:


- I've been trying out some nice new recipes, and I've got a new food-related obsession... More on that next time! ;-)

- I finally caved in and created an account at Swap-bot. I'm starting out with a couple of simple, low cost swaps, and I'm really enjoying my experience so far! Do any of you swap at Swap-bot? Share your stories!


What have you been up to in the past weeks? Crafting, reading, baking, or just enjoying the lovely weather?

Time for spring

Spring arrived in my kitchen a few days ago - at 1.15 PM, apparently!


I'm really glad spring is finally here, this winter has been pretty awful! Rain and sleet and icy winds... I'm SO ready for summer! My friend Sara and I are throwing a big Easter picnic on Monday to celebrate the season. Can't wait! I think I might make some Easter-themed cupcakes. What do you think?


My sister had a birthday a couple of weeks back, and I decided to make her some little lavender sachets. I love lavender! It reminds me of childhood, because both my mom and my grandmother used to keep lavender sachets in the closets and cupboards.


Recognize the lovely ribbon? It's the one I received in Jenny's giveaway in February! I thought it would look nice next to the soft colors and vintage buttons.

Oh, and before I forget: There's a lovely giveaway going on over at Diary of a Quilter. Pop in for your chance to win some lovely fabric squares!

Time for toadstools

My swap packages have been received, so I can finally post about them! I thought I'd start with the Buy Nothing/Green Swap I joined in an effort to de-stash. One of my partner's themes was toadstools, so I made her a toadstool pincushion!


Here it is hanging out in my craft corner... I almost didn't want to send it off! :-) But my partner seemed to like it, so I'm glad I did!


Continuing on the toadstool theme, I also made a little mixed paper notebook. I assembled the pages and sewed them together on my sewing machine, and it worked beautifully!


Don't you just love toadstools?