Thrifty weekend

First of all, a big thank you to everyone who left such nice comments about my quilt! I posted a thread about it on Craftster, and it got so much attention that my quilt was featured in the "Hot New Projects" section for a while:

hotnewprojects

It was great fun and also resulted in some new readers for this little blog, so I'm happy!

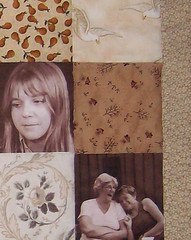
This weekend hasn't involved a lot of crafting, but I did do a lot of craft-inspired shopping! I'm still scouting the Gothenburg area for good thrift stores, and I haven't found any that I really love yet. Any Gothenburg residents reading this, let me know which stores you like! On Saturday I went to a flea market in a part of town called Bellevue, and spent about an hour wandering around in search of craft-worthy objects - keeping my eyes peeled for deals with the help of a slightly less enthusiastic boyfriend. Keith has been working the late shift for a few days now, so he wasn't overly excited about getting up early to look for wool sweaters and teacups. He puts up with a lot, poor man! :-) I found a few neat things at the Bellevue market, but you do have to wade through a lot of rubbish to get to the good stuff, so I wouldn't recommend it unless you've got a lot of patience! On Sunday, we went to a big thrift store called Holmens Marknad. We didn't stay there too long as they mainly sold furniture, and our little apartment is pretty full as it is! But of course I didn't leave empty-handed. Here are the results of my thrifty weekend:

HPIM2057 HPIM2055

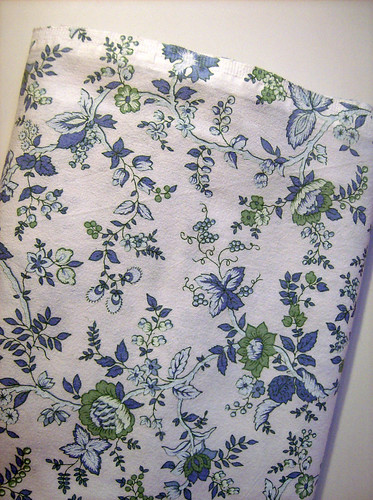
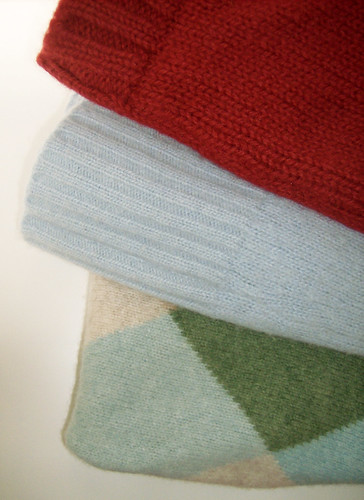
The lovely blue and green fabric is a bed sheet, I'm not sure what to use it for yet but I love the print! I'm afraid my camera isn't quite good enough to show the pretty colors. The second pic shows a couple of nice wool sweaters that are going to become mittens, brooches and other neat things inspired by Betz White and her amazing felted wool creations. And I'll leave you with my very favorite purchase: these cute buttons that I foresee will be used a lot in the future as my sister is due to give birth to a baby girl next month!

HPIM2048

Memories

Remember that little sneak preview I showed you last week? I finally uploaded enough pictures to tell you the whole story! This is easily the largest sewing project I've ever done all by myself, and I can tell you it involved A LOT of research and scanning the web for tutorials! It was so rewarding to teach myself everything from scratch! The result? My very first memory quilt!

HPIM1904

The idea of making a memory quilt for my mom came into my head about six months ago. Both my grandparents passed away last year after being sick for a long time, so naturally it has been a rough time for her and for the whole family. For me, working with this quilt was a good way of seeing past all the sadness and remembering all the wonderful things about our family. I wanted it to reflect happy memories, so that she (and all of us) could look at it and remember all the good times.

It is a quilted wall hanging, about 28" x 32" in size. Incorporated in the design are 8 photos, printed on awesome EQ Printables fabric sheets. I thought I would just give you a quick review of the different products I tried for the photo squares - I could write half a book on photo transfer techniques after this! I first tried a couple of different inkjet iron-on transfers, but they all gave the fabric a really thick, yucky plastic coating. Then I tried printing the photos on Miracle Fabric Sheets which looked OK - they didn't have the drawback of the plastic coating, but the contrast and color depth were not very good. I finally tried the EQ sheets and the quality was SO much better! Strong colors, sharp lines and a really good quality fabric. I very much recommend it for projects like this! It is a bit pricey, but I want this quilt to survive for a long time so it was definitely worth it! Here are a few close ups of the squares:

HPIM1912
HPIM1909
HPIM1908

The last one is not a photo, but I think it's my favorite square in the whole quilt! It is cut from an old pillow case, embroidered by my great grandmother! It shows her initials, MB, and it's got to be around 70 years old. I can't believe how many times this has been washed, and the embroidery still looks perfect! I was so happy that I managed to incorporate it into the quilt, I really feel it adds another dimension to it.

HPIM1905

This is a picture of the back. I used fleece as batting, because I didn't want the quilt to be too "fluffy". After machine quilting the layers together, I used this great tutorial to make the hanging sleeve. It turned out great but all that hand sewing was such a pain! I wanted the stitches to look nice and neat (my mom is a textile crafts teacher so I just knew she would look...) plus you have to be really careful not to stitch through the quilt top. I made that mistake once and had to rip out several inches of tiny stitches... I barely finished in time to wrap it up before my mom arrived!

HPIM1927

When it was finally done I just sat and stared at it for a while, I was so pleased! It was a bit hard to give it up after having spent so much time on it, but I know it will be loved in its new home! I'm planning to visit my mom in July to check out her new sewing studio, so hopefully I'll be able to show you what it looks like on her wall (did you put it up yet, mamma?) then!

Whew, what a long post! I hope you didn't fall asleep halfway through? I'm so excited about finishing this project, I could go on about it for hours... But I've got to get up early tomorrow (the flea market beckons!) so I really can't spend all night blogging. Shame! :-) Have a great weekend!

Even more stamps

Yes, that's right - I was on a roll tonight and made another six stamps! I decided to make some simpler designs, just to practice. I didn't want to start something huge and then be disappointed if it didn't work out right. Also, some of the lovely Craftster ladies suggested I join an upcoming stamp swap, and I if I do decide to join I want to be sure I can make something I feel OK about swapping... Gotta hate that "swap anxiety", right? Anyway, I made a rose, a toadstool, a little bird, some trees, and also a stamp with my initials, KB. I'm not sure what I'm going to use them for yet, so I just tried them out on some paper scraps. I really love grace's idea about making my own gift wrap, I think the toadstool print could work really well on a Christmas present, wrapped with some burgundy ribbon.

HPIM2031
HPIM2028

I also got a few new ink pads, and made some more birdie notecards, trying a few different color combinations. Which one do you like best?

HPIM2012
HPIM2021

The second pic shows a pack of notecards I gave to my friend Sara today when we met for lunch. I don't write nearly enough to use all the notecards I had printed up, so I thought it would be better to just give some away! It seemed to go down well, so then I started thinking about doing a giveaway to draw attention to my blog... Do you think that would be a good idea? Sara and I also went around some shops after lunch, and she suggested that I could approach some local shop owners and ask if I could sell postcards or notecard sets in their shops. It's not something I see myself doing in the near future, but still it would be awesome to know someone liked something I made enough to pay, you know, actual money for it! :-)

I have really been neglecting my schoolwork this past week, so you might not hear from me for a couple of days as I struggle to catch up on my reading. I'm going to have to take a break from rubber stamping anyway, before I carve up every eraser in the house... My speedy-stamp block is half finished, and as you can see from the tree stamp in the second pic I'm already looking for alternatives... It's such a hassle ordering new blocks from Ebay, but I'm sure I could never find proper carving blocks in Swedish stores. Living in a small country has its downsides sometimes! Have a great week everyone, I'll be back soon with more craftyness!

Stamps and swapping

Today has been a busy crafting day! Unfortunately I can't show you everything that I made just yet... I finished two ATCs for the Alphabet ATC swap at Craftster, but I'll have to wait to post pictures of them until they are received. I was really pleased with my cards this time - it's always like a little bereavement, sending them away... But hopefully their new owners will like them too. Here they are, on their way to the post office:

HPIM1989

Looking through all my papercraft supplies also inspired me to carve another stamp. I recently bought a Speedball stamp carving kit off Ebay, and fell instantly in love with it! This time I knew I wanted to make a bird stamp, and after a bit of sketching this is what I came up with:

HPIM2010

This is only the second stamp I've ever made, and obviously it's not perfect. I had a lot of trouble with the sharp corners, but hopefully I'll get better with some more practice. I'm also thinking about trying to buy some more Speedball cutter blades, the kit only came with two and none of them are really good for details. Any stamp carvers out there? What tools do you like to use? Anyway, despite the imperfections I'm really proud of this stamp. I can see myself getting a lot uf use out of it. Here it is on a bunch notecards, with one of my colored pencils for size:

HPIM1998

And a closeup of the little birdie:

HPIM2003

I had so much fun making this! I'm thinking of carving another birdie to put in the upper corner of the notecards as well. I'm going to go to the craft store tomorrow to buy some more inkpads (right now all I have is this brown one), so you'll probably be seeing some more notecards and stationary in the near future. I'm also trying to think of other ways to use this stamp. Do you have any ideas?

It's getting late and I should have started on some of my required reading for my summer class (I'm taking Economic History - sounds like fun doesn't it?) this evening, so that's all for today. Have a good evening!

Taking the plunge

I've been thinking about starting my own craft blog for ages, but it hasn't been easy to pluck up the courage. There are so many creative, beautiful and well written blogs out there, what could mine possibly contribute? But finally, I decided that blogging seems like too much fun to miss out on. I love reading about what other crafters make and do, and hopefully my blogging will be able to inspire someone else.

Who am I, you might ask? I'm a 23 year old Swedish girl, a university student, and I re-discovered crafting about a year ago after having lived a decidedly un-crafty life for years. When I was little I used to love drawing, painting and creating, but it seems I lost my creativity somewhere along the road to adulthood. I'm now trying to reclaim it by trying my hands at different crafts, and re-learning how to use a sewing machine. My mother is a textile crafts teacher, so sewing has always been a part of our family life. After my boyfriend Keith and I moved in to our very first apartment, I saved up to get my own sewing machine and claimed a corner of our kitchen as my "craft space". Although my crafting time is limited by school, work and a generally busy life, I now spend as much time as possible in my little corner!

Enough talking, let's see some pictures! I thought I'd share a few pics of the sort of things you can expect from me in the future. My photography skills aren't the best, but bear with me:

HPIM1894
ATCS AND PAPER CRAFTS. This is an ATC I made for an Alphabet ATC swap over att http://www.craftster.org/. I've recently started making ATCs and it's great fun! The card is a get well card for a friend of mine (feel better soon, Sara!) made with vintage trim and my very first hand carved stamp. "Krya på dig" means "Get well soon" in Swedish, in case you were wondering. :-)

HPIM1633 cropped HPIM1973 edited
EDIBLE CRAFT. I love cupcakes! This is a vegan raspberry and lemon cuppie with buttercream frosting. I have several vegan friends and relatives, so I do a lot of vegan cooking/baking. I also make a point of cutting down on my own meat and dairy consumption - vegetarian food is better for the environment and yummy! The second picture shows today's lunch, a chickpea burger in a whole wheat and oatmeal bun. I was super pleased with how the chickpea burgers turned out, I will definately be making more soon. This time I just sort of winged it, but next time I'll be sure to write down a recipe and share it with you!

HPIM1898 cropped
SNEAK PEEK. Lastly, here's a little sneak peek of a much larger project I will be blogging about soon. One of my biggest crafty challenges to date! Check back soon to find out more about it.

There! That wasn't as scary as I thought it'd be! Thanks so much for stopping by for my very first post. If there's anything you'd like to know about me, or anything in particular you'd like me to feature, do leave a comment and tell me about it. See you around!